
Using the Acrobat plug-in manager in Mac OS X
|
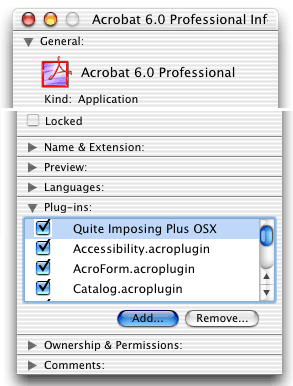
In Acrobat 6.0 under Mac OS X, plug-ins can be installed, removed, and disabled with the plug-in manager. This is useful because the Plug ins folder is now invisible, making it hard to install plug-ins with drag and drop. To add a plug-in, follow these steps. 1. Make sure Acrobat is not running. 2. In the Finder, locate the Acrobat 6.0 Professional or Acrobat 6.0 Standard icon. There may be two icons by this name, one a folder, and the other one the application. Make sure you find the application. 3. Single click on the icon and use File > Get Info or Command+I. |
|
|
4. The information panel will appear (illustrated to the right). Click the triangle to the left of Plug-ins to open the plug-in section. 5. Click Add and you will be able to select the files you need to install the plug-in. You may have to click Add more than once to add several files. Note that you may need to install files that don't seem to be plug-ins, like manuals, because they need to be kept with the plug-ins. 6. Start Acrobat. The Plug-ins list is not updated immediately in some versions of Mac OS X, if you want to check you should close and re-open the information panel. |
|
Problems?We have found a number of common problems, so if these instructions don't seem to work for you, please read our troubleshooting page.Removing or disabling plug-insThe plug-in manager can also be used to remove or disable plug-ins.
|
|