n-up is shorthand for 2-up, 3-up etc., that is, combining more than one different page together on the same sheet. Quite Imposing takes care of the details of combining pages, once you have answered some questions about what you want. It reads the current document, but does not change it, and creates a new document with the pages arranged onto sheets.
It's worth knowing what the n-Up Pages feature can do for you:
- You
can scale pages down to make more of them fit on a sheet.
- You
can make each sheet have a fixed layout, like 3 across and 2 down, or just ask
to fit as many pages as possible.
- You
pick a maximum size for each sheet. You can ask for a tall or wide page layout,
or choose "best fit", which chooses tall or wide to get the most
pages onto each sheet.
- You
can have unused space removed around the edge of each sheet, so that the
combined document contains neatly arranged pages with no wasted space.
- You
can add margins (also known as "gutters") between each page, and
around the edge of each sheet.
- You
can add frames (lines around the edge of each page), and crop marks (special
marks outside the page which allow the pages to be trimmed after printing).
- You
can use Tile
pages before n-up if required. Any
bleeds previously defined in the document are honoured, as described in About
bleeds .
- Align row by row controls whether
- The alignment box is aligned, but the rows are left aligned in the alignment box (NO)
- The alignment box is aligned, and each row is also horizontally aligned (YES)
- Align each sheet independently controls whether
- the alignment box is the same on each sheet (NO) or
- The alignment box is as small as possible on each sheet (YES).
- Align row by row: NO
- Align each sheet independently: NO
- Short rows are always left aligned in the
alignment box
- Layout starts at the top of the alignment
box, so there may be extra space if the rows have different sized pages.
- Align row by row: NO
- Align each sheet independently: YES
- Short rows are always left aligned in the
alignment box
- Layout starts at the top of the alignment
box, but because the alignment box is only as large as it needs to be, the
tallest page in the last row will be bottom aligned.
- Align row by row: YES
- Align each sheet independently: NO
- Short rows are aligned row by row, so since
the sheet is to be right aligned, each row is right aligned.
- Layout starts at the top of the alignment
box, so there may be extra space if the rows have different sized pages.
- Align row by row: YES
- Align each sheet independently: YES
- Short rows are aligned row by row, so since
the sheet is to be right aligned, each row is right aligned.
- Layout starts at the top of the alignment
box, but because the alignment box is only as large as it needs to be, the
tallest page in the last row will be bottom aligned.
- The
margins at the edge of the page. For example, if the margins are left=10mm,
right=30mm, and you mirror left to right, then on the back (even) sheets you
will have a left margin of 30mm and a right margin of 10mm.
- The
alignment. For example, if you choose an alignment of top left, and mirror left
to right, then the back (even) sheets will have an alignment of top right.
Choosing options for n-up Pages
You will select options on three dialogs, then click the Finish button. The options won't be described in detail, since they just reflect the features already described.
You use the Next button to step through each screen of information, and you can also use the Back button to change settings on earlier screens.
You will notice that on the first screen you can choose whether or not you want pages to be scaled. In most imposition tasks you will want to place every page at 100%.
The choices on the final screen will change depending on whether you chose scaling. Notice in particular the effect of choosing a particular layout like 3 x 2.
Choosing alignment
Provided you select Sheets will not be trimmed on the first screen, there will be an Align button on the third screen. In Quite Imposing 1.x, alignment was always top left. The most common alternative will be to centre pages, but any side or corner can also be chosen.
There is also an option Align all sheets independently . This makes no difference if all sheets are equally full. But if some sheets have fewer pages, the normal behaviour is to align them all to match each other, so incomplete sheets line up. If this option is selected, each sheet is handled separately, so that if, for instance, you choose centring and the final sheet has 1 page only, it will be centred.
N-Up & Step and repeat: more alignment choices (6.0)
A new choice is available in 6.0 under the Alignment options (click Align on dialog 3). The option is “align row by row”.
The effect of this option is to look at each row of pages as it is placed on the sheet, and align it according to the horizontal alignment (left, right or centre). Normally, the pages are considered as part of a sheet or as part of the entire document.
This may be especially useful when a layout includes a partial row, and the requirement is to have the pages on front and back of the sheet line up. It would often be used with aligning the rows in the centre. Otherwise, it is the entire page of sheets which is aligned in the centre, and the short row will align to the left of the other pages.
There are now a lot of choices and it can be hard to visualize the effect. So the Align dialog now shows a guide to the effect of your options. This is NOT a preview of actual pages, but designed to show the effect of your settings with different types of page layout (for example, full rows or short rows; all pages the same or pages different sizes).
A key concept is the alignment box. This is the area that is aligned according to your “Align where” settings. It is shown by a dotted line in the pictures. The pictures show two sheets (four sheets if front and back are mirrored). The first sheet shows pages all the same size, and the second sheet shows different mixed sizes.
The sheet independence and row by row options are important, but if each sheet is filled with pages of the same size they will have no effect at all. You only need to consider these options if the pages are not completely filled, or you have a mixture of different sizes.
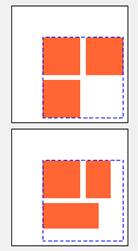
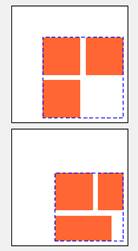
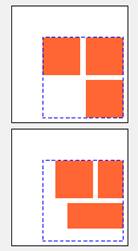
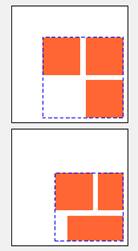
Here is an example of just one case – bottom right alignment – with the different settings for align each sheet independently and align row by row).
In these pictures, the orange boxes are the pages on the white box (sheet). The alignment is bottom right, but you can see there is a small margin, the same on each example.
|
|
This
shows the effect of having both independent settings off. The
alignment block (dashed line) is the same on each page. The software scans
the whole document to find the tallest and widest box needed,
and uses it for all pages. The
general alignment here is bottom right. Notice that only the alignment
box is fully in bottom right. |
|
|
This
shows the effect of having sheet independence only The
alignment block (dashed line) is different on each page. It is the box needed
to hold the pages on the current sheet. The
general alignment here is bottom right. Notice that only the alignment
box is fully in bottom right. |
|
|
This
shows the effect of having row independence only The
alignment block (dashed line) is the same in all sheets. The
general alignment here is bottom right. Notice that only the alignment
box is fully in bottom right. |
|
|
This
shows the effect of having row and sheet independence The
alignment block (dashed line) is different on each page. It is the box needed
to hold the pages on the current sheet. The
general alignment here is bottom right. Notice that only the alignment
box is fully in bottom right. |
Remember this is just an example of one alignment value, and page layout not mirrored. You can use the alignment dialog to see the effects of all the different values.
Selecting
margins and spacing
You have three choices for margins and spacing in n-up processing: none at all, simple, and advanced.
Simple margins and spacing will satisfy many needs. You can specify a margin, to appear all round the sheet, and a spacing, to appear between each row and column on the sheet.
Advanced margins take longer to set up, but give more flexibility. Click the Advanced margins and spacing check box if required, then click the Setup button.
You can now select a value for each of the four margins: top, left, bottom and right (remembering that, if you do not automatically trim pages, the right and bottom margins may be larger, but will never be smaller).
You can also select values for spacing (or "gutter"), both horizontal and vertical. These allow you to put a single value or a list. In either case, the value(s) are repeated as often as needed. The list of values must be separated by spaces only.
Example
of advanced spacing
Take a look at this example, which has an exaggerated scale. To achieve this arrangement you would use the following, assuming the current units from General Preferences are mm.
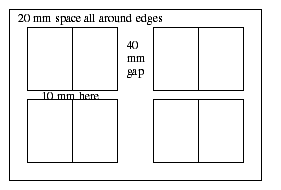
Top margin 20
Left margin 20
Bottom margin 20
Right margin 20
Horizontal spacing: 0 40
Vertical spacing: 10
Notice how the horizontal spacing list starts to be repeated to give 0, 40, 0.
Mirroring options
Starting with Quite Imposing 3.0, you now how options for "mirroring". These are to help in cases of double sided printing where material needs to line up so that the front and back are in line.
You can set mirroring in two places: advanced margins and spacing, and alignment. It is important to note that these set the same options, and mirroring always applies to both together.
You can mirror left to right, which is a common requirement, or top to bottom, which is less common. You can combine both.
Mirroring affects even-numbered sheets, which are considered to be the back sheets in double sided printing (1=front, 2=back, 3=front, 4=back, etc.) Mirroring affects the following:
Mirroring does not affect anything else. In particular it does not affect the spacing between pages on the sheet, and it does not change the rule that pages are placed left to right, top to bottom. The reversed order of pages across rows needs to be accounted for in Shuffle Pages.
N-up and Step
& Repeat: Mirrored flow
(5.0)
Note: this function
is not designed for use after the Shuffle Pages feature, as the layouts will
not be correct in this case. It may be possible for you to create different
Shuffle rules for this case.
The N-up function
takes a document and lays it out on a larger sheet in rows and columns. Before
5.0 it always laid out in order of sheets, filling each row, then the sheet,
before moving to the next sheet. This means the front of a printed sheet is
always finished before the back of the sheet is started. In 5.0 there is a new Flow
control on the third N-Up dialog.
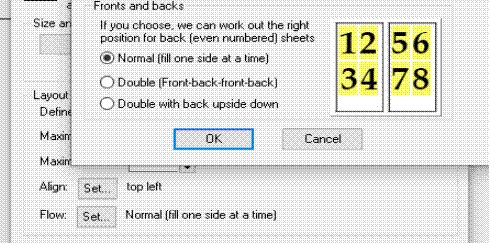
If this value is set to Normal it will work the same as previous releases, filling each sheet (or side of the sheet) in turn.
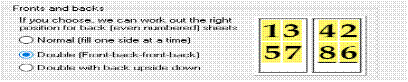
If you choose the option Double (Front-back-front-back) then the pages will be placed alternately on the front (odd numbed sheet) and back (even numbered sheet). In addition, the page placed on the back will be in the left-right mirror position – so pages are laid out right to left, rather than left to right. This means that when the sheets are printed double sided, the back will be in the correct position. (Note that only the page positions are numbered; the page contents are unchanged).
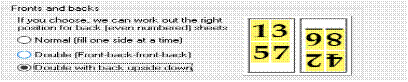
If you choose the option Double with back upside down the pages are positioned so that, if the back of each sheet is turned upside down, it will be the correct position so the front and back of each page are aligned.
Notes about n-up pages
1. As you change options like
layout and page size on the final screen, the bottom of the screen will show an
up-to-date calculation for number of sheets, sheet layout etc.
2. You can automatically apply
backgrounds from a different PDF file, as described in Using backgrounds . All background pages must
be the same size for n-up processing.
3. Quite Imposing uses Smart
crop marks which will not overlap the
contents of pages (but which can overlap bleeds). If you switch on crop marks,
you can click the Custom button to change the mark size and spacing.
4. You can use the n-Up Pages
feature even if the pages are different sizes. If you choose automatic scaling,
and a fixed layout like 2 by 3, this will be followed, though the scaling
chosen will be based on the first page. If you don't choose a fixed layout, the
pages will be fitted as tightly as possible.
5. Page layout always starts in
the top left hand corner, and runs from left to right,
then top to bottom.
6. If your choices mean that
some pages would be larger than the target sheets, the sheets will be enlarged.
You will be warned and given the chance to cancel.
7. By choosing a 1 by 1 layout
you can use this function to add margins or crop marks around existing pages.
8. If you choose background
sheets and choose to trim sheets, you may lose part of the background
(depending on the alignment chosen).