Variable Data Merge reads a text file containing information, then uses that information to add text and pictures to a PDF. Text is added as if by the Stick On
Text And Numbers function, and pictures are entire PDF pages, as if added by Stick On PDF Pages. The text file is called a “data source”.
There are two ways to
use Variable Data Merge.
- With a master document. The master document is copied again and
again, and each copy has different text or pictures added from the data
source. This is similar to Data Merge/Mail Merge
functions in many apps, such as Microsoft Word® and Adobe InDesign®.
- With a normal document, which is not duplicated. Instead, the data
source is used to add information to pages in the document. This is like
using Stick On Text And Numbers/Stick On PDF
Pages, but sticking different text or images on each page of the document
(or each group of pages).
The text file contains
“columns” of information, with a heading. The columns are separated by commas,
tabs, or semi-colons (;). Consider this file:
Name,Company Name,State,Logo
number
Robert Smith,Printing Wins Inc, New York,2
Lisa Roberts,,California
"Phillipa Thompson, Jr.",Images Matter,Mass,1
This uses commas to
show these rows and columns
|
Name |
Company Name |
State |
Logo number |
|
Robert Smith |
Printing Wins Inc |
New York |
2 |
|
Lisa Roberts |
|
California |
|
|
Phillipa Thompson,
Jr. |
Images Matter |
Mass |
1 |
There are four lines
in this file. The first line has the names of the columns. Column 1 is Name,
Column 2 is Company Name, Column 3 is State and Column 4 is Logo number.
The other lines show
three “records”. You can see a few points of interest: Lisa Roberts has no
company name, so you see two commas together (,,), and
no Logo number. Phillipa Thompson, Jr. has a name containing a comma, so the
entire name is put in straight quotes as "Phillipa Thompson, Jr."
Files like this are
commonly exported from spreadsheet apps. To use this file, we choose the
Variable Data Merge command.
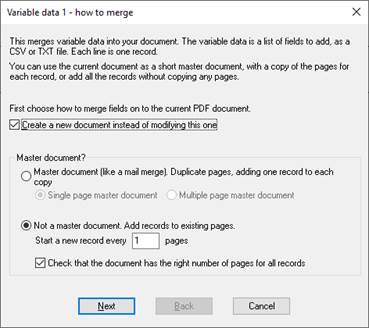
We first have to
choose whether we have a master document or not. If we have a master document,
it is usually just one page, but it might be more than one, for example front
and back of a sheet. The entire document is the master, and if you
choose “Single page master” the current document must have only one page. This
is a simpler case and used to check the input.
If you choose Not
a master document you need to choose how many pages in the current document
are used for each record. The usual value is 1. You can choose whether an
incorrect number of pages is an error.
Next you choose the
data source file
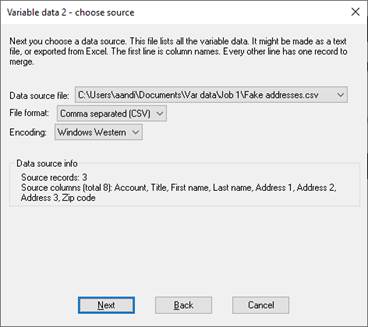
You say what
separator and encoding to use. If not sure, you may have to experiment, but
look closely at the Data source info, which should show the columns you wanted.
Now you need to
choose where the information is to be added to your document. You must add one
or more “fields”.
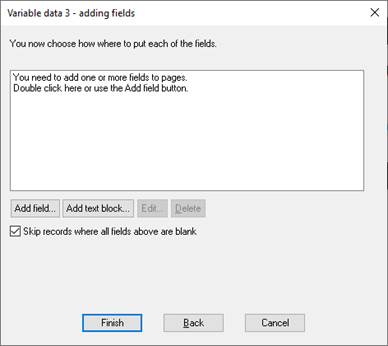
If the fields are simple
text, you will choose the font, size, position, colour etc. for the text each
time the information is added. To add more than one piece of text together, see
Text blocks, below.
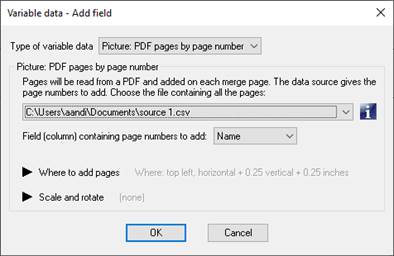
If the fields are
pictures you must prepare a single PDF with pages containing the pictures to be
added. The data contains a simple number giving the page number to add.
Text
blocks (5.0)
Text blocks are a powerful feature of Variable data merge which allow you to create a block of text for applications such as mailing labels, with features including
- Preview of the block showing exactly how a record will appear
- Combine columns onto a single line
- If a line would be blank, optionally close up the gap
- Add extra text mixed with the columns
To show this we take a typical contact spreadsheet with columns Account, Title, First name, Last name, Address 1, Address 2, Address 3, Zip code. After defining the source, we go to the Variable data 3 – adding fields dialog and click Add text block.
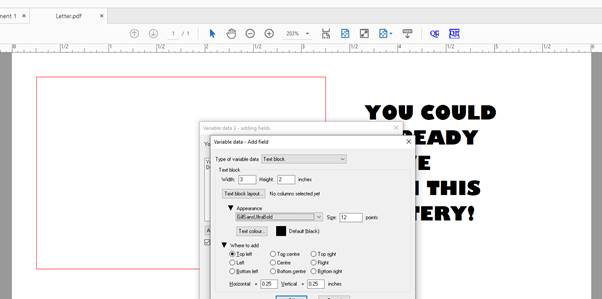
On the Add text block dialog you will choose a block size, here 3 x 2 inches. The current page (in Acrobat only) will show a red box where the block is to be added. We type in the required offset on the page. We choose a font and size. Now we click Text block layout.
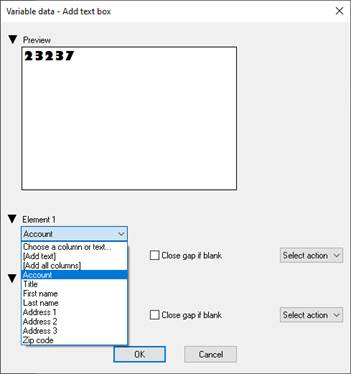
The text block has
as many elements as you need. To get started it has added the Account column,
but we want most of the columns. So we pull down the “Account” field and choose
[Add all columns].
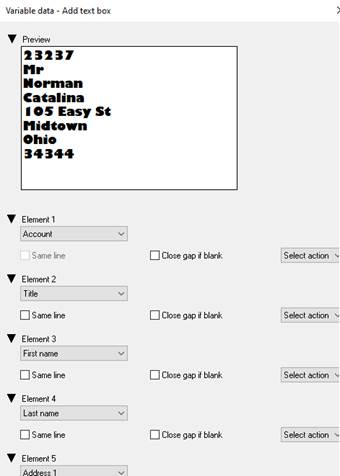
We now adjust the columns as needed.
- To remove the account number, click Select action at the right and select Delete.
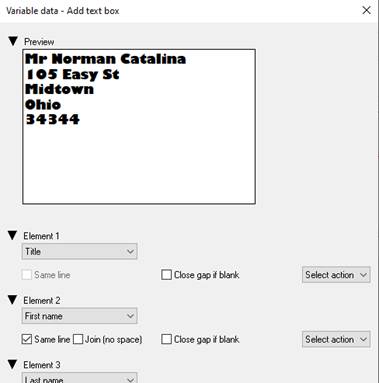
- For First name and Last name, we click Same line to run the name onto one line
- For Address 1, Address 2 and Address 3 we click Close gap if blank to remove blank address lines.
The new preview will appear.
You can have multiple text blocks, and mix them with simple text and picture fields too.
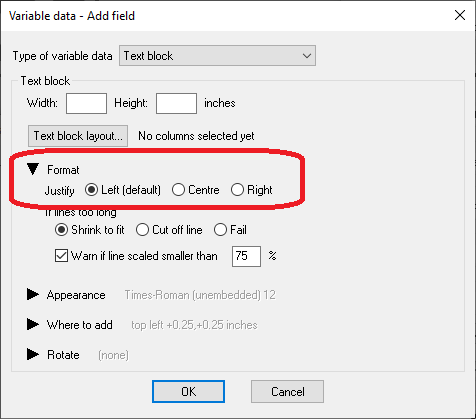
Justification in text blocks (6.0)
You can now set justification options for a text block. By default, they are left justified, but they can also be centred or right justified. You can set this for an entire block, but single lines can have a different justification.
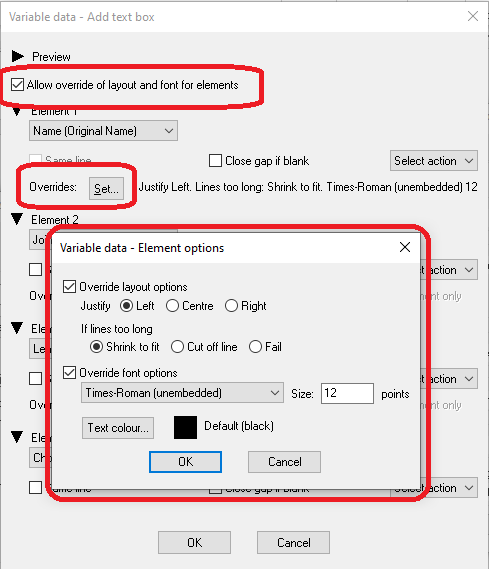
Overrides in text blocks (6.0)
You can override
- Justification
- Behaviour if lines are too long (for instance there may be certain fields which it is acceptable to cut off, and you don’t want constant warnings).
- Font options: font name, size and text colour.
Text block handling of long lines (6.0)
Data sources may contain lines that are too long to fit in the text block. In 5.0, long lines are just cut off without warning
By default, in 6.0 long lines are scaled to fit, with a warning message if anything is reduced below 50% (half original size).
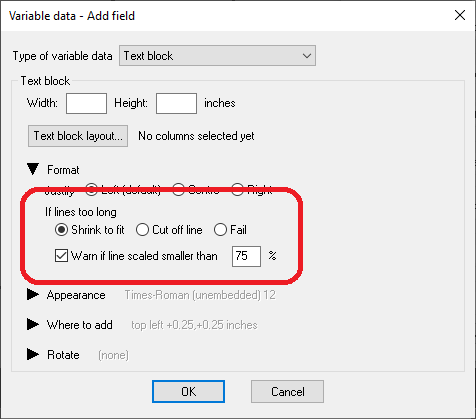
You can set options on each text block, and override for single lines (for example, you may be happy for an address to be reduced to half size, but not a barcode font). The options:
- You can scale down text (the new default). You will by default get a warning if it is scaled below 50%. You can set the percentage for warnings (for example choose 80% if you don’t want it reduced below 80% of original size).
- You can choose to cut off text as in earlier versions. You will by default get a warning
- You can choose to fail (stop with an error message) if lines are too long
You can turn warnings off. In Quite Imposing Plus, you will get a chance to continue. In Quite Hot Imposing, it will always continue, but add a warning to the log.
Text block preview (6.0)
Version 5.0 shows a preview of the text block for the first row in the data source. The preview has many new features in 6.0.
Navigator. You can now look at different rows from the data source using the navigator buttons below the preview. There are first / previous / next / last buttons.
View specific record. There is a Go button in the navigator to preview a specific row by number.
Find text. There is a Find button in the navigator. It searches for a row containing your text, and previews that row. The Next button continues the search.
Find long lines. The Find button also allows you to search for
long lines (too long for the text block). If text is cut off it will be
previewed in red (on screen only, not in the final result).
If the text is scaled (which is the default), it is highlighted in blue.
Other text block enhancements (6.0)
Because you can switch font in a text block, you can now have a line in an address using a barcode font. Note that barcode fonts usually have special rules for each font, and may need extra software to generate the string to use. You can’t usually just type the barcode number.
Rotation. The entire text block can be rotated on the page. This does not affect the view on screen.
Fixed text. A text block can now contain only fixed text, so it is always the same. This might be used for a return address or special message that can be easily changed. There must be at least one field (other than the text block) with a column reference, otherwise all the pages would be the same.
Data block field organising/templating (6.0)
New features in 6.0 allow more control over organising fields. These options are available by choosing “Show advanced options” in the Fields setup dialog.
This allows fields to be disabled, so they do not appear on the page, but they remain available so they can quickly be added to another job. You can have multiple versions of the same text block, and work on experimental new text blocks without removing the old setup. Fields can also be given names to help you organise them.
When you click Show advanced options, the following extra options appear:
- In the Add Field or Edit Field dialog, a new choice Disabled appears. A disabled field does not appear in the merged pages.
- In the Add Field or Edit Field dialog, a new choice for Name appears (this is optional). You can use the Name to make a description of the field, which may be essential when there are multiple similar fields to choose from.
- In the list of fields, a new Duplicate button appears. When a field is duplicated, it is automatically disabled so the two fields don’t just overlap each other.
- In the list of fields, new Move up and Move down buttons appear, to organise the list.
For multiple similar merges, we suggest making up a sequence with all fields and blocks. This sequence can be duplicated (using Sequences – Manage – Duplicate) and then fields/blocks enabled/disabled as needed.