Step & Repeat rotation to fit more pages (6.0)
Step & Repeat has the option (on screen 3) to rotate pages to make more pages fit on a sheet. Example: 5 x 2 on 9 x 14. Tall: 7. Wide/best: 8. With rotate, tall: 10. With rotate, wide/best: 11.
The option is not available for N-up or when pages are scaled.
|
Layout: tall |
|
|
|
|
|
|
|
Layout: tall |
|
|
This example shows the effect of the different settings with a 5 x 2 inch page placed with Step & Repeat on a 9 x 14 inch sheet. Notice how the pages are still laid out from top left, running horizontally, even if individual pages are rotated. It may be useful to note that rotation is always applied to a whole row at a time, never single pages in a row.
Note that you might prefer to see the short rows centred, rather than forced to the left, if you are going to print the step and repeat sheets double sided. This can now be done using the “align row by row” option described below. This option can always be set but will have no effect unless there are short rows, and there can normally only be short rows if using rotation is allowed.
When rotate pages is selected, it makes certain changes to the default processing, even if no pages are actually rotated. These changes are complicated, but should mean things just work and pages back up when using the “mirror layouts” options. It should also mean that if no new options are chosen, then the layout is exactly the same as in 5.0, so it is fully compatible.
To summarize, if you want a step & repeat to back up (front pages lining up with back pages), choose both the options “allow rotation if it will fit more pages on a sheet” and “align row by row” in the Align dialog.
The changes are:
· When selecting “mirror layouts horizontally”, the rotated pages are rotated clockwise on front (odd numbered) sheets and rotated counter-clockwise on back (even numbered) sheets.
· When selecting “mirror layouts vertically”, the rotated pages are rotated clockwise on both front and back sheets. However, the unrotated pages are actually rotated by 180 degrees on the back (even numbered) sheets. This is needed so that the unrotated pages and rotated pages both back up correctly
· When selecting “mirror layouts vertically”, the back (even numbered) sheets will include the rotated rows before the unrotated rows, the opposite of the front (odd numbered) sheets.
· It is possible to select “mirror layouts horizontally” and “mirror layouts vertically” at the same time. This combines both settings.
N-Up & Step and repeat: more alignment choices (6.0)
A new choice is available in 6.0 under the Alignment options (click Align on dialog 3). The option is “align row by row”.
The effect of this option is to look at each row of pages as it is placed on the sheet, and align it according to the horizontal alignment (left, right or centre). Normally, the pages are considered as part of a sheet or as part of the entire document.
This may be especially useful when a layout includes a partial row, and the requirement is to have the pages on front and back of the sheet line up. It would often be used with aligning the rows in the centre. Otherwise, it is the entire page of sheets which is aligned in the centre, and the short row will align to the left of the other pages.
There are now a lot of choices and it can be hard to visualize the effect. So the Align dialog now shows a guide to the effect of your options. This is NOT a preview of actual pages, but designed to show the effect of your settings with different types of page layout (for example, full rows or short rows; all pages the same or pages different sizes).
A key concept is the alignment box. This is the area that is aligned according to your “Align where” settings. It is shown by a dotted line in the pictures. The pictures show two sheets (four sheets if front and back are mirrored). The first sheet shows pages all the same size, and the second sheet shows different mixed sizes.
The sheet independence and row by row options are important, but if each sheet is filled with pages of the same size they will have no effect at all. You only need to consider these options if the pages are not completely filled, or you have a mixture of different sizes.
Here is an example of just one case – bottom right alignment – with the different settings for align each sheet independently and align row by row).
· Align row by row controls whether
o The alignment box is aligned, but the rows are left aligned in the alignment box (NO)
o The alignment box is aligned, and each row is also horizontally aligned (YES)
· Align each sheet independently controls whether
o the alignment box is the same on each sheet (NO) or
o The alignment box is as small as possible on each sheet (YES).
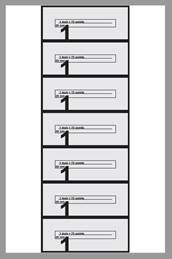
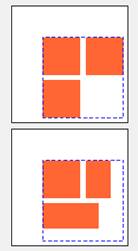
In these pictures, the orange boxes are the pages on the white box (sheet). The alignment is bottom right, but you can see there is a small margin, the same on each example.
|
|
This
shows the effect of having both sheet independent and align row by row settings
off. ·
Align row by row: NO ·
Align each sheet independently: NO The
alignment block (dashed line) is the same on each page. The software scans
the whole document to find the tallest and widest box needed,
and uses it for all pages. The
general alignment here is bottom right. Notice that only the alignment
box is fully in bottom right. ·
Short rows are always left aligned in the
alignment box ·
Layout starts at the top of the alignment
box, so there may be extra space if the rows have different sized pages. |
|
|
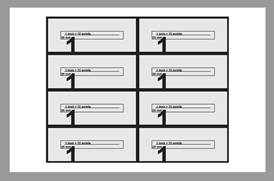
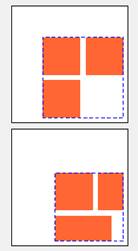
This
shows the effect of having sheet independence only ·
Align row by row: NO ·
Align each sheet independently: YES The
alignment block (dashed line) is different on each page. It is the box needed
to hold the pages on the current sheet. The
general alignment here is bottom right. Notice that only the alignment
box is fully in bottom right. ·
Short rows are always left aligned in the
alignment box ·
Layout starts at the top of the alignment
box, but because the alignment box is only as large as it needs to be, the
tallest page in the last row will be bottom aligned. |
|
|
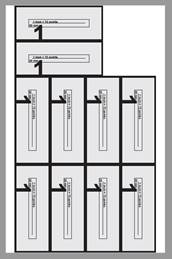
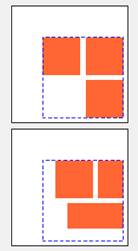
This
shows the effect of using row by row without sheet independence ·
Align row by row: YES ·
Align each sheet independently: NO The
alignment block (dashed line) is the same in all sheets. The
general alignment here is bottom right. Notice that only the alignment
box is fully in bottom right. ·
Short rows are aligned row by row, so since
the sheet is to be right aligned, each row is right aligned. ·
Layout starts at the top of the alignment
box, so there may be extra space if the rows have different sized pages. |
|
|
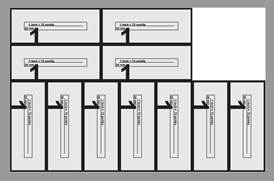
This
shows the effect of using row by row and sheet independence ·
Align row by row: YES ·
Align each sheet independently: YES The
alignment block (dashed line) is different on each page. It is the box needed
to hold the pages on the current sheet. The
general alignment here is bottom right. Notice that only the alignment
box is fully in bottom right. ·
Short rows are aligned row by row, so since
the sheet is to be right aligned, each row is right aligned. ·
Layout starts at the top of the alignment
box, but because the alignment box is only as large as it needs to be, the
tallest page in the last row will be bottom aligned. |
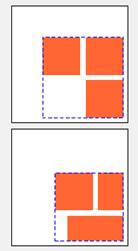
Remember this is just an example of one alignment value, and page layout not mirrored. You can use the alignment dialog to see the effects of all the different values.
Crop mark enhancements (6.0)
Crop marks now have an option to set a white background (in custom crop mark set up). This is useful when the crop marks need to contrast with an existing background. This also applies to crop marks in Manual Imposition and Create Booklet.
The colour is “almost white”, in fact 1% white. This is chosen to avoid issues where whites may disappear if overprinted. The background thickness is the same as the mark thickness.
Peel Off Crop Marks also peels off any background.