Of all the functions in Quite Imposing this is the one which will require the most preparation. It re-orders pages according to a set of instructions of your choice.
This is not usually the last step in imposition. This is most often followed by n-Up Pages or Manual Imposition . The order of the pages reflects what binding will be given to the final book.
To work out the order of the pages, you may read from a reference book or make a folding model, a piece of paper you fold according to your requirements, then number the pages and unfold to read off the required order. The front and back of the model will usually (but not necessarily) appear on separate plates.
In working out the required order, you should remember that if you are going to use the n-Up Pages function, it will lay out pages from the top left, going from left to right then top to bottom.
You can choose whether to create a new document with a rearrangement of the current document, or to rearrange the current document itself. Until you are experienced, we'd strongly recommend you create a new document.
In Quite Imposing 2.0 you now have two options. You can type in a string we call a rule which gives instructions on how to re-order the pages. But you can also use the Shuffle Assistant, which knows about many of the most common imposition methods, and means you only have to type in the numbers of the pages on the front of the first sheet.
Working with the Shuffle Assistant
If you are new to Quite Imposing we recommend using the Shuffle Assistant at first, and you may want to continue using it for most of your work.
You will only need to type in the numbers on the front of the first sheet, and to indicate how they are turned (often some are upside down). But, to emphasise, you do need to know those numbers. A folding model is recommended if you don't have a reference for these numbers.
After you have entered the information you can see a preview of the front and back, and click More to see the other pages. When you click Finish you return to the Shuffle page with a rule and other details filled in. Generally, do not change these details, because they have been worked out exactly for your job.
So, with the rule still shown click OK and your document will be shuffled to the required order. The next step usually is to run n-Up Pages .
A simple example for the Assistant
Let us suppose you have a 32 page document and want to order it for saddle stitch imposition, that is, a single fold for the whole document. This would be two pages per sheet.
You'd select 2 columns, 1 row and 32 pages.
Click Next and type in the two boxes 32 and 1. (This order is because when opening the outside of the book, the front of the first sheet, the back page is to the left).
Quite Imposing will work out the required rules and ordering so when you click Finish the rules are prepared. Note that you will see a group size of 4. This is correct: do not alter it.
A more complex example for the Assistant
In this case we have a 64 page book, but each sheet will be folded separately. There are four pages on a side, and the sheet is sideways. After making a folding model, you see that the front and back look like this:

So, after choosing columns 2, rows 2, and page count 64 you first enter a screen like this:
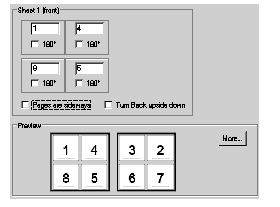
The order is correct, but the pages are not rotated correctly. We can see that they all need to be sideways, so we click Pages are sideways and get:
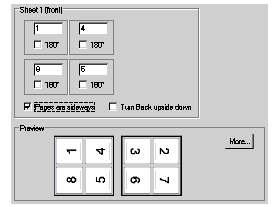
This is close but pages 4 and 5 (on the front) are still the wrong way round. Just click the 180° button below 4 and 5, and you have the result you need.
Importance of the page count
The page count is important, because it tells the assistant the highest numbered page. It may sometimes happen that your document is "short", that is, that it doesn't have enough pages to completely fill all the sheets. For example, in a document that is printed 2 on each side of a sheet, a 14 page original will need 4 sheets. In this case you must tell the assistant that you have 16 pages, not 14, to completely fill the sheets.
You also may need to enter the numbers of missing pages. For instance, you might have to enter 16 and 1, for the 14 page case above.
Note also that page numbers you type must start at 1, even if that is not what you think of as page 1. Some printed materials might start at page 3, because a separate cover, wrapped around, provides page 1. Still, to work with the assistant you must treat your page 3, as if it is page 1. Simply subtract 2 from each page number in this case.
Shuffle Assistant – single sided option (6.0)
Version 6.0 supports a choice of “double sided” or “single sided”.

The difference between them is that, when choosing double sided, the back sheet will automatically contain the sheet matching the front of the sheet, but mirrored from right to left. Single sided can be used for simple runs of pages, or for single sided cut stacks. It cannot be used for groups of pages in multiple bindings (“perfect bound”).
Types of imposition that the Assistant knows
The Imposition Assistant can recognise many of the common imposition patterns from the front only. It does not know the layout of these patterns, this comes from what you type, but it knows how to repeat these patterns onto the back, and onto the later sheets. Those it currently understands are as follows:
- Single
sided impositions, where you type in all of the pages
that appear. For example, if the page count is 12 and you select 4 rows and 3
columns, this must all fit on a single side.
- Two
sides only. This doesn't have to be repeated, but the assistant will make sure
that the front and the backs are paired up, and not
repeated. For example, if the page count is 8, and you select 2 rows and 2
columns, this must all fit on two sides.
- Single
sheet signatures. In this case each sheet is fully folded before being
combined. For example, if you select 2 rows and 2 columns, and the assistant
finds pages 1 to 8 on the front and back of the first sheet, this must be a
single sheet signature. The page count can be any multiple of 8.
- 2
sheet signatures. In this case each 2 sheets are folded together, then
combined. The order repeats after each 2 printed sheets (4 in all, front and
back).
- 4
sheet signatures.
- Saddle
stitched documents, which have their final fold all together. For instance, if
you choose 96 pages and the assistant finds pages 1 and 96 on the front, this
must be saddle stitched.
- Cut
stacks documents, where you will cut the pile of sheets into separate stacks
and lift them one onto another. Note that only double sided
cut stacks are supported.
More patterns may be added in future.
Working
with rules directly
You might choose to enter the rules directly. Perhaps you have an imposition that is not recognised by the assistant. Perhaps you want a special purpose shuffle. Perhaps you worked with rules in Quite Imposing 1.x and want to continue to do so. Perhaps you can type a complete rule more quickly than setting it up in the assistant.
Choosing the rules
There are only two pieces of information for you to choose. First you must choose the group size. This is the number of pages before the ordering sequence starts again. You can type in an order for a whole publication of, say, 64 pages, but there is usually no point, since each sheet or pair of sheets is likely to follow the same rules.
The rules you type are repeated again and again until the document is exhausted. If the number of pages in the document is not an exact number of groups, blank pages will be added to fill out the last group, before starting the rearrangement.
The rules themselves are just a list of page numbers in the first group. For instance, if you have a group size of 16, you would list all of the numbers from 1 to 16 in the order required.
Here is a rule for a group of 4 which just reverses the order of the pages in each group: 4 3 2 1.
Sometimes it is necessary to rotate pages as well. You can follow a page number immediately with an asterisk (*) or star symbol to have it turned upside down. Also, you can use less than (<) to rotate 90 degrees anti-clockwise, and greater than (>) to rotate 90 degrees clockwise.
Here is a simple rule for a group of 4 which reverses the page ordering and flips the odd-numbered pages upside-down: 4 3* 2 1*.
A rule can also contain the letter X as often as required. This will insert an extra blank page.
You can now instantly preview the effect of the rules. Click the Preview button on the shuffle pages screen, and choose the eventual layout you will have (for instance, 4 columns and two rows on each sheet). Quite Imposing will show the effect of a shuffle by using a grid of pages containing numbers. You can check how the entire document will be laid out.
It is now possible to
use .. (two dots) in a rule for a range of pages. For
example 5..8 is exactly the same as typing 5 6 7 8, and 4..1 is exactly the same as typing 4 3 2 1.
Here is an example
rule: “1.100 200..101”. This rule, with normal repeat
and a group size of 200, would reverse the order of pages 101 to 200, and
repeat to reverse pages 301 to 400, 701 to 800 and so on.
A worked example
Let's suppose you have folded up a sheet of paper, or looked up information in a reference book, and you conclude that each page must be rearranged like this:
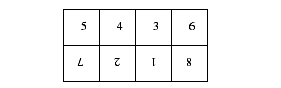
That is, the bottom row are all upside-down.
You can combine pages into this 4 by 2 arrangement using n-Up Pages but first you will have to re-order the pages. You will need to enter the following information:
Page order 5 4 3 6 7* 2* 1* 8*
This example is simpler than most. Often, the front and back of the sheet will make a single rule, since the front and back aren't identical. Just remember that the rule can cover more than one sheet, and that n-Up Pages will work through the pages, filling sheets, in the order they are arranged.
Another worked example
This example shows how to make sheets that appear to be incomplete, by inserting extra blank pages before running n-up. Although you can use Insert Blank Pages , it is easier to insert the blanks at the same time as shuffling pages, if you already have to shuffle.
Here is a possible layout of the first four sheets:

To obtain this layout you would arrange for blank pages to occur wherever there is a space on the sheet.
Page order 12 1 8 5 2 11 6 7 10 3 X X 4 9 X X
The X entries will insert the blank pages which are shown on the layout above surrounded by broken lines.
Shuffling for a 4-up booklet
Quite Imposing has built-in support for simple booklets which appear with 2 pages on each sheet. One reason it does not include support for booklets with 4 pages per sheet is that there are a great many different ways to lay out 4-up booklets. The following gives just one suggestion, but it is not ideal, as we will see on the next page.
This sequence can be used to make a 16-page booklet, or to make a booklet of any size containing 16-page signatures (essentially a number of booklets bound together one after the other, as in a bound book).
This illustration shows the layout of four sheets (intended to be printed double sided onto two sheets of paper).
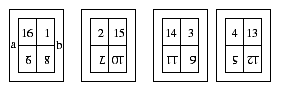
This is a group size of 16 and a page
ordering rule of
16 1 9* 8* 2 15 7* 10* 14 3 11* 6* 4 13 5* 12*, followed by using n-up to lay
out 2 by 2.
After printing onto the two sheets of paper:
1. Place the two sheets
together, and fold along the line between a and b, so that 16-1 is facing you.
2. Now fold in half again, so
page 1 is facing you.
3. Trim off the bottom edge
(cutting off the fold a-b).
Folding models may seem complicated but this only took a few minutes.
Shuffling for a larger saddle stitched booklet
There are two problems with the rule we discussed on the previous page.
1. You might not want to type
the long sequence necessary to shuffle a larger booklet or magazine.
2. In practical terms, the method
we suggest is not suitable for a thick booklet, because of the physical
limitations of paper. Putting all the sheets together to make the first fold (a
to b) would be awkward, and would tend to cause the
contents of pages to shift.
For the second reason, impositions intended for thick booklets with a single fold (called saddle stitched) will usually make one or more fold to each separate sheet (perhaps 2 sheets). Only the final fold, for the spine, might be done after combining sheets, but even that is normally folded in advance, and the folded sheets slipped together.
Quite Imposing can deal with the rules for saddle stitching.
Using the Repeat button you select saddle stitching. Then, you define a rule which covers all folds except the last one. That is, you consider how many sheets are folded together before they are combined and folded along the spine.
Most often this is just one sheet, so the rule has to cover just the front and back.
A booklet with no additional folds (except the spine fold) can be completely described by the rule 4 1 2 3, and the saddle stitch option, no matter how many sheets it will contain.
Details of the Repeat function
The Repeat button can be used to select between four choices as to how the groups will be repeated. What these actually do can be fairly complex to describe mathematically, so it is probably best to think of them in terms of how they are used.
- Normal,
or perfect bound . The rules are repeated again and again from the beginning. For instance,
if you have a group size of 4 and a rule of 4 1 2 3, the pages will go 4 1 2 3
then continue with 8 5 6 7 12 9 10 11. The sequence just starts again. The rule
is typically the front and back of the first sheet, but
can be multiple sheets.
- Saddle
stitched.
Use this when the final document is to have a single fold right through. Often
the front of the first sheet will have the first and last page on it. A rule of
4 1 2 3 will produce different results depending on the page count. For an 8 page document, the result would be 8 1 2 7 6 3 4 5 For a
12 page document, the result would be 12 1 2 11 10 3 4 9 8 5 6 7.
The basic idea to generate a saddle stitch rule is to reduce your imposition to two sides, the front and back of the first sheet. Prepare this as if it is the whole book, for instance if there are 4 pages a side, your rule will number 1 to 8. This will stretch automatically as required.
- Single
sided cut stacks . This will be printed on only
one side of the paper. After printing, it will be cut, and without turning any
piles of paper upside down, will be combined into two. For instance
a group of 2 and a rule of 1 2. If there were actually 8
sheets, the final order would be 1 5 - 2 6 - 3 7 - 4 8.
The rule must always list only the order for the front of a single sheet imposition - imagine the job reduced to one sheet.
- Double
sided cut stacks.
Like single sided, but printed on both sides of the
paper. For instance a group of 4, listing front and
back, might be 1 3 4 2. If there were actually 8
sheets the final order would be 1 5 - 6 2 - 3 7 - 8 4.
The rule must always list the order for the front and back of a single sheet imposition.
Advanced cut stacks (6.0)
Cut stacks are used for many purposes. Not just regular books, but stacks of adverts or books of tickets for example. Version 6.0 adds additional types of stack, which meet special requirements.
- Consecutive pages per group (A).
- Start stacks again after a maximum number of groups (B)
This information is often shown in a compact form as “Advanced stacks (A,B)”. B is zero if the stacks never need to start again. We illustrate this using the shuffle assistant, but a shuffle of this type can also be entered without using the assistant.
Two examples of consecutive pages per group is seen here. They are single sided (no backs). In this example a
page count of 1000 is specified.
This might be used to print a book
of numbered tickets. In the example below, the printed sheets will be cut once,
top to bottom, to make two booklets of 100 sheets, each with five tickets.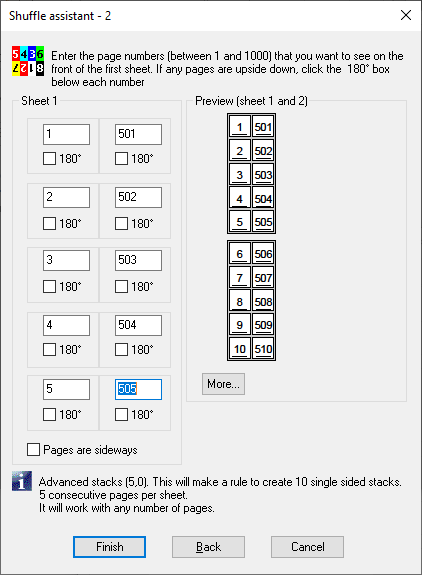
Page count = 1000
Notice that in the example above,
the “start stacks again after groups” is zero i.e. the zero in “Advanced stacks
(5,0)”. This means that the rule will adapt to any number of pages. For
example, if it is run with 1600 pages, it will make stacks of 160 sheets.
Now we take an example where the
page count is larger – 2000 can be chosen but any number which is a multiple of
the pages per sheet and larger than 1000 will do. 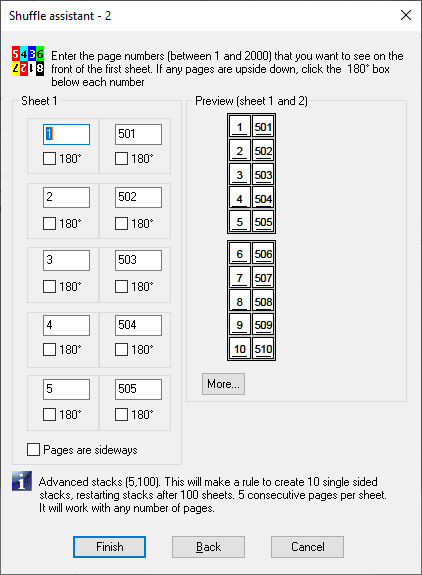
Page count = 2000
The page numbers typed in the
assistant are impossible for a 2000 page layout done as normal stacks. In a
2000 page layout the numbers would need to be 1001-1005 rather than 501-505. So
the software knows the stacks must have limited depth. Notice it reads
“Advanced stacks (5,100)” – so it is repeated after 100 groups. Since it is
single sided, the group is one sheet, and the 100 groups hold 1000
tickets/pages. This layout would be
printed, then divided up into exactly 100 sheet stacks. Each stack would then
be split vertically, and would yield two booklets.
This layout is also adaptable to
any number of pages, but it will always break up into the specified number of
sheets, finishing with fewer sheets if needed. To emphasise, in Shuffle
Assistant, the decision of which type to use is based on the page count.
Repeating after groups can also be
used without repeating counts, to create stacks of limited depth.
A new example for a 4-up booklet
This example returns to our earlier problem, a 4-up booklet. But this time we will define the rule using the saddle stitch option (on the Repeat button). Here is the layout for the front and back of a booklet made from a single sheet:
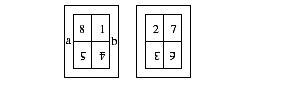
This sheet would be printed on both sides, folded along the line a to b first, then the final fold.
This has the rule: 8 1 5* 4* 2 7 3* 6* and group size 8.
If you try the same rule with larger booklets and the saddle stitch option, you will find it automatically adjusts to any number of pages. For instance this is what will happen with two sheets. Remember that each sheet is folded separately along the line a to b before being combined.
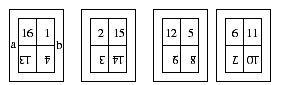
So long as you select the saddle stitched option under Repeat , the same rule is used, with a group size of 8, no matter how many pages are in the document.
Notes on Shuffle Pages for Imposing
1. There are other tools which
shuffle pages, and they are usually simpler to use if they apply. You can use Shuffle
Even/Odd Pages
to process
even/odd pages separately; this will do things Shuffle Pages for Imposing
cannot do, like split even and odd pages into two separate files. This would
most often be done as the last step, after n-Up Pages .
2. To reverse the order of all
pages, you can use Reverse Pages .
3. If you miss out any pages in
the sequence, you will receive a warning message. The implication is that you
want those pages to be deleted, but it is more often caused by a mistake. For
safety, you will not be allowed to use a sequence that deletes pages unless you
select the Create New Document option.
4. You can enter page numbers
more than once in the sequence. Again, this is usually a mistake, and you will
receive a warning message. If you confirm that you want to continue, you will
have pages duplicated, which is sometimes useful. As with page deletion, you
must select the Create New Document option. If you choose a group size of 1,
you can just list page 1 as many times as you want copies of each page, and the
whole document has all of its pages copied that many
times.
5. Manual
Imposition allows you to place pages in any order. Nevertheless, you
will find it much more convenient to rearrange pages into a logical order
before you start.
6. You can save the options
used, just as for most other imposition actions, using Remember Last Action , and use the options again
with Playback
Action . You can also use the
shuffle as part of Automation sequences whether or not the Shuffle Assistant was used.