For a general discussion of bleeds in PDF and imposition, please read About bleeds .
Choices on the Bleed dialog
You can select five different ways to define bleeds for the current page or document. Bleeds are specified relative to the current page size, which may be cropped. Important: bleeds no longer follow cropping; you must redo them.
1. Every edge of the page has a
bleed of a fixed amount. You fill in a single value and this bleed applies to
all four edges.
2. The three edges, except the
fold edge, have a fixed bleed. As above, but the fold edge does not acquire a
bleed. The fold edge is the right of even-numbered pages and the left of
odd-numbered pages. Useful for manual imposition which will otherwise allow
overlap.
3. Define bleeds for the four
edges separately. You fill in four separate numbers, for maximum flexibility.
Normally, the bleed is the edge of the visible area on each page. However, each of the three above allow you to select Bleed is outside the currently visible area. This allows you to take the bleed from the invisible portion of the page. This is only sensible if you have previously cropped the page, as the bleed area cannot be set larger than the media box (typically, the original page size).
1. Set the bleed interior from
the crop box, and exterior from the media box. The crop box is the visible area
of the page. The media box is usually the original size, before it was cropped.
This is a convenient way of converting cropping directly into bleeds.
2. Remove bleeds from the
selected range of pages does what it says. Note that if the PDF/X option is
selected in Imposition Preferences pages
will have a Trim box set equal to their Crop box, since PDF/X requires a Trim
Box.
A warning about reaching outside the page
Warning: as with Trim And Shift , define bleeds can make information outside the page's normal edge visible. However, there may be nothing there, as it may already have been cut off. We recommend you take your bleeds from the interior of the page, or from an area which originally formed part of the page, but has been cropped.
In practice you may well find that elements placed overlapping the page edge do appear as a bleed, but a future upgrade to Acrobat could make them disappear.
Using the Bleed dialog
Once you have selected the bleed dialog it will remain open until you click Close . There is no need to close it before performing other functions.
As long as the bleed tool is open, bleeds are highlighted in every page displayed on screen. The method of highlighting may change. In 6.0 it is shown as a red box outline for the interior and exterior of the bleed. This has a white shadow so it should be visible even where the background page is red. When there is a bleed of zero size, it is adjusted on screen to show a very narrow strip, rather than disappearing. The actual bleed definition is not changed.
You can define bleeds for a single page, a range of pages, or an entire document. You can also apply bleeds to only even or only odd pages. Note that there is one option which will automatically mirror bleeds between odd and even pages for the most common requirements.
You can memorise bleed requests using Remember Last Action . When you use Playback Action , the Bleed dialog is opened if necessary, then all the values are set back from the memorized request (except page number). You can then confirm the page range and press Apply. Bleed requests can be used in Automation sequences .
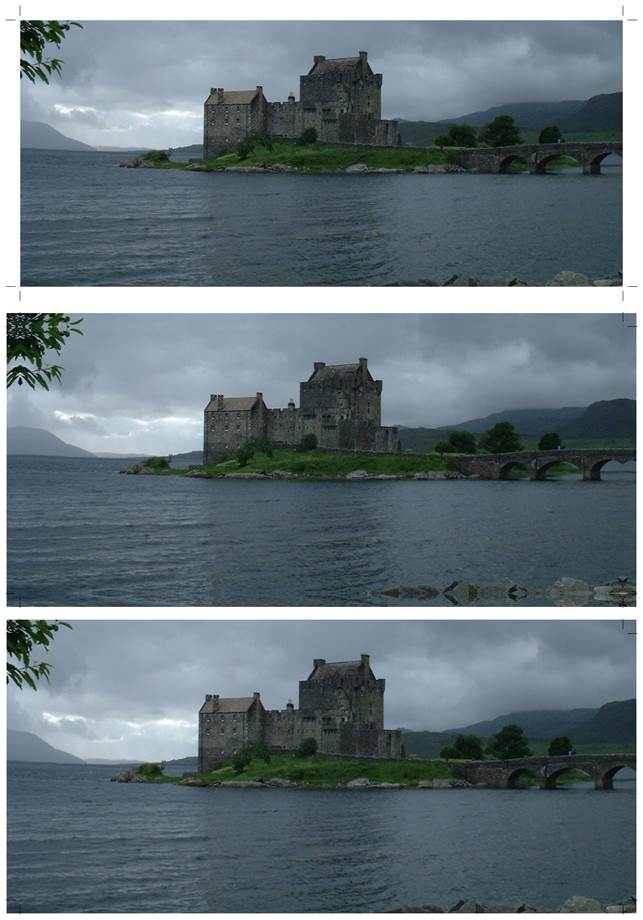
Generating content for bleed area (6.0)
There is now the option to generate bleed, when increasing the bleed area. Sometimes it is necessary to put some content into the bleed area, even if it is not perfect. There are now three options when adding bleed.
- To do nothing, as in earlier releases (this is the default). The bleed area may be filled with white space – however – depending on other settings – content that was cropped off may be exposed.
- To use a mirror of the edge of the page to fill in the bleed. This is often a good choice, but can produce strange effects at the edge of some graphics.
- To scale the trim box up to fill the bleed box. This reduces optical effects, but it may mean that important details are cut off.
This illustration shows the effect of these three choices for the same original image, with exaggerated settings. They are in the same order as above.
Bleed that is added is not visible if there were already graphics in the space where they are generated. In other words, generated bleed is always sent to the back.
When you add bleed you can choose the option Bleed is outside the currently visible area. This is usually needed when generating bleed, since otherwise the edge of graphics you can already see is used. When you add bleed outside the visible edge of the page, you now have the option to make the enlarged bleed area visible. This is especially important if you are generating bleed, so you can check the results.
Sometimes the bleed space has already been added, but it is discovered that graphics are cut off and an unwanted border appears when printing and trimming. A new option “Generate bleed only” can be used with these choices to mirror or scale the trim box to fill the bleed box. This can be used when the trim box and bleed box are already correct, but you need to put information to fill this area.
When using “Generate bleed only” the option “Make bleed area exactly visible (set crop to bleed)” is available. Since you can also set “No extra info added” this is a simple way to just set the crop box to the bleed box and no other change. When using “Generate bleed only” the option “Make bleed area exactly visible (set crop to bleed)” is available. Since you can also set “No extra info added” this is a simple way to just set the crop box to the bleed box and no other change. (The effect of setting the crop box to the bleed box is that the size you see on screen is exactly the outside of the bleed – any extra contents or labels are no longer visible, though they are not deleted).