It is often useful to be able to add text, especially page numbers, to a document, just before printing it. Quite Imposing Plus allows fixed text or "fields", automatic values such as date and file name.
The command is most simply used by selecting from the tabs.
- "
Number" to just add page numbers
- "
Text" to just add text
- "Both"
to add a page number with text before and/or after, such as "page 11"
- note that you would type "page" followed by a space to get this
effect.
- "Field"
to just add a field. (Combine fields and text using Advanced options). Note
that "fields" are put into the PDF as normal text, they have no
connection to PDF form fields.
In all cases you have the following options:
- Font
and point size. The list of fonts is built into Acrobat nd
cannot currently be extended.
- "The
position for numbers. This can be based on any of the four corners, or top or
bottom centre.
- The
offset for numbers. See Text Offset, below, for a full discussion.
- Which
page(s) to process, including the option of only odd or even pages. (This might
allow you to number odd and even pages on opposite sides, for instance. Note
that page numbers still increase for the pages you do not number).
Once numbers, text and fields are stuck on they are a part of the document and will print with it. You can, however, remove them with the Peel Off Text and Numbers function.
If you need to remove existing numbers which you did not stick on, you can hide them using Stick On Masking Tape
As well as page numbers, numbering can be used for other purposes such as ticket numbers. Advanced options allow you to number pages in forms like 1,1,1,2,2,2 or 10,20,30.
Leading zeroes ("Bates stamping")
If the number you type has leading zeroes, the result will too. For instance if you type 00098, the pages will go 0098, 0099, 0100, 0101.
Shortcuts (4.0)
- You can hold
down Shift when you click the triangle to open or close all groups at
once.
- You can hold
down Shift when you click Apply
to apply and close at once (same as the old OK button).
- Normally when
you click Close you get a
warning if you have not yet clicked Apply.
If you hold down Shift you can close immediately.
Working with fields (variable data)
Sometimes you want to add information to a page that isn't the same every time.
To add a field, you can choose an item from the pull down list. You can choose:
Total number of pages. (Tip: if adding " of ..." using Advanced options be sure to type a space before "of".)
- Date,
either in the format dd/mm/yy or mm/yy/dd
- Date
and also time in the form hh:mm:ss
- File
name, either the full path name including directories,
r just the name of the file.
- The
name of the directory holding the file (not the full path name of the
directory)
- The
Title field from document info
- The
name of the current computer
You can combine fields with text and page numbers using Advanced options, see below.
Advanced options - numbering
When you choose "Show advanced options" you will see a number of new options. You can also combine text, numbers and fields at once.
You will see "Repeat each number ... times and then increase by ...". For normal behaviour, set both of these values to 1.
You want may set "Repeat each number" to something other than 1 if you have to number multiple copies. For instance, you may have a 30 page document which is 3 copies of each page in turn. You could choose "Repeat each number 3 times" to number the pages 1, 1, 1, 2, 2, 2, 3...
You may want to set an "Increase by" value to other than 1 if you need a special numbering such as pages numbered 100, 200, 300 etc. To get this you'd set an "Increase by" value of 100.
You can also set an "Increase by" value such as -1, so that numbers go down instead of up.
Another advanced option is "Add text every ... pages". Normally this is 1, so you add text to every page. Set this to 5 and it would add text every fifth page (i.e. number one page, then skip 4 pages).
Page numbers are not increased for the pages you skip. (This is different from choosing odd only, or even only, where the pages you do not number still affect the numbering). Should you need to increase numbers for pages that you don't add text to, you can use the "Increase by" number at the same time.
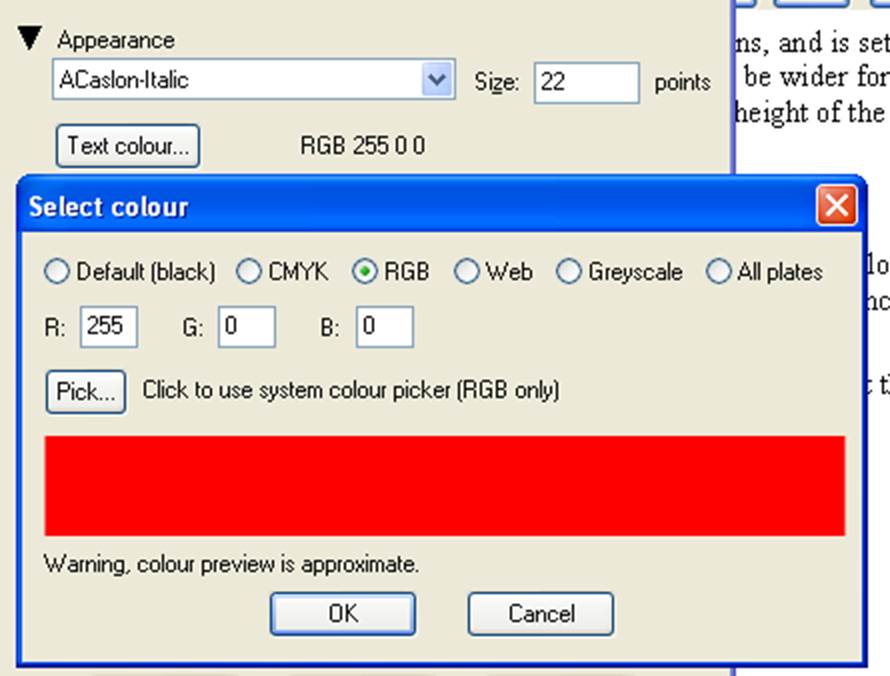
Changing colour (4.0)
Previously text could
only be set in black (or registration colour). You can now choose colours in
RGB or CMYK, as well as greyscale and registration.
Points to note
include:
- RGB and CMYK
are not tagged with an ICC profile, they are simply uncalibrated colours.
- Colour values
for RGB are in the range 0 to 255, while those for CMYK are percentages in
the range 0 to 100.
- Colour previews
are very approximate.
- If choosing All
plates it is recommended to use 100%.
Text rotation (4.0)
Text may now be
rotated by 0/90/180/270 degrees (counterclockwise). To allow text to be
positioned down either side, the choice of locations for adding text now
includes “left”, “centre” and “right” as well as the top and bottom edges.
It may be useful to
know that the text is aligned according to its baseline, not the centre of the
text.
Preview box (4.0)
A problem with
previous versions is knowing exactly where the text will appear relative to
other elements. A preview box is now shown. This does not include the text, but
a red box shows the area.
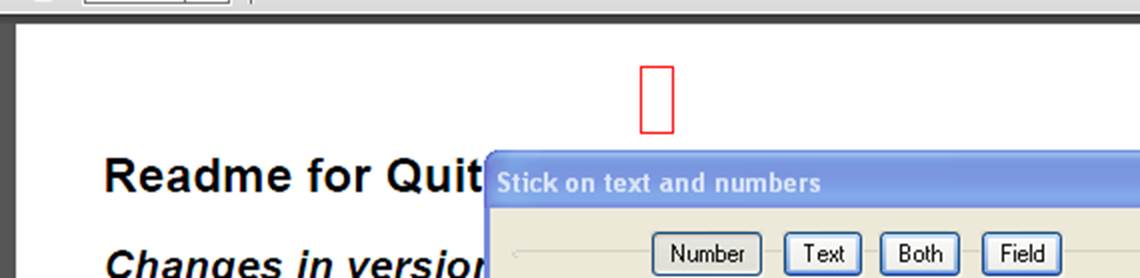
The box position will
move automatically when you change options, and is set
to the width of the text that will actually appear (so, for example, it may be
wider for page 10 than for page 9, if it is adding numbers). The box is not the
exact height of the text, but is set from the point
size.
Advanced options - fields
When using Advanced options, fields appear as text in the "Text before" or "Text after" boxes. (Note that if you select "No numbering" these are both simply run together).
To add a field, you can choose an item from the pull down list labelled "Add field". Choosing an item in the list does not make sure it is put on the page. You need to do the following
1. Select the item you want to
add from the "Add field" list.
2. If you already have text to
add before or after the page number, make sure the cursor is at the point you
want to add the field.
3. Click Before to add to the
text before; click After to add to the text after.
Fields will appear in the text as regular editable text such as "[Doc:NumPages]". This can be edited. If the field name is not recognised, the text, including brackets, will appear on the page.
Note that the file name used is the current file name. If you want to save the file with a new name and use that on the text, save it first, then number, then save again. In Quite Hot Imposing it is the input file name. If pages are inserted from other files, it does not change the file name that is used, it remains the current file name.
Text Offsets
The aim with the offsets in Stick on Text and Numbers is that they do the most logical thing, but it is worth knowing some basic rules:
- The
distance given is in the logical direction, e.g. in the top right
hand corner, the horizontal distance is to the left, and the vertical
distance is down. For the top centre and bottom centre, the horizontal distance
is to the right.
- The
vertical distance is measured to the base line below the text, even when
measured from the top of the page. If you place text with a vertical offset of
zero from anywhere on the top edge, it will be invisible since it is just above
the page edge.
- From
the bottom left or top left, the horizontal distance is to the left of the
text.
- From
the bottom right or top right, the horizontal distance is to the right of the
text, which is therefore right justified.
- From
the bottom centre or top centre, the horizontal distance is to the centre of
the text. A horizontal offset of zero will centre the text on the page.
Using
registration colour
When adding text (including numbers) you can select Use registration colour instead of black . You will not see any difference on screen; differences will only be obvious if making colour separations.
In general, you would use this option when numbering imposed sheets which are to have colour separations made, but never when numbering pages before imposition.
The registration colour may be set using Imposition Preferences to one of the following values:
- Black
only . In this case the option has
no effect when adding text.
- CMYK
. If
making separations, the text will appear on the cyan, magenta, yellow and black
plates but not any spot colour. Take care if using this option with a black and
white page; it may produce unwanted separations. In addition, some composite
colour printers may use all inks, producing an area that is visibly darker than
the usual black ink.
- All
separations . On level 2 and 3 PostScript
devices producing their own separations, the text will appear on all plates. In
some cases the same as CMYK.
The choice made in Imposition Preferences also affects crop marks placed by n-Up Pages , Step And Repeat and Manual Imposition .
Embedding fonts (4.0)
You can now place text
using many embedded fonts, provided that:
- The fonts are
installed in the system.
- The characters
are only “Latin 1”, which is largely the characters used in
- The font
contains the characters needed
- The font
license allows embedding
- The font contains
Unicode information
Some symbol fonts can
be used, so long as they appear to be a Latin1 Unicode font.
The choice of fonts
available before are still available, and they include the label “(unembedded)”
to separate them from your system fonts. Existing automation sequences and XML
files using these fonts will continue to be valid.
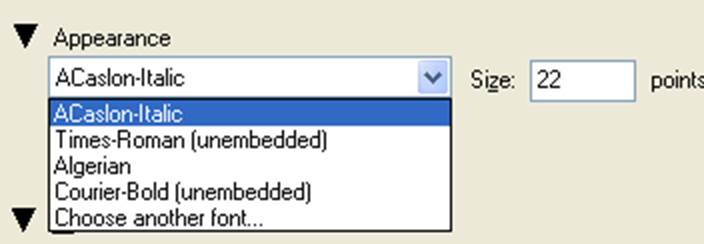
There are now
potentially many fonts, so the product shows only the ones you have recently
used. Click Choose another font to
see a list of all fonts in the system (which includes those which are
unsuitable for one reason or another).